
Choose Your Implementation Type
When it comes to sending serverless emails with Firebase, there are primarily three options available, regardless of how your app is deployed or plans to be.
Opting to delegate email sending tasks to Firebase offers notable advantages in terms of security, message queuing, and convenience. It's important to first determine which of the following solutions best aligns with your app's needs. Further in this article, I will delve into each option in more detail, specifically focusing on the Node.js environment
Trigger email
This option is a native extension within Google's serverless architecture but is the most challenging in terms of implementation and offers the least flexibility. Utilizing a Firestore database for email dispatch necessitates a subscription to the Blaze plan, which incurs a fee.
SMTP email service
Offering greater flexibility, this method does not require a database for operation and permits continued use of the basic, free Firebase plan. However, a significant drawback is the security risk posed by the need to supply your email's raw credentials to the Firebase function, which could potentially lead to vulnerabilities.
Cloud email service
This option shares the flexibility of the SMTP email service but enhances security. The primary disadvantage is the need for a functional external cloud email service. Conversely, utilizing a service like SendGrid allows the sending of up to 100 emails per day for free, without necessitating a credit card, offering a blend of security and functionality with services such as email delivery tracking and spam filters.
Trigger | SMTP Service | Cloud Service | |
|---|---|---|---|
Configuration Difficulty | medium; requires Firestore | Very easy; no database needed | Very easy; requires a workable cloud email service |
Flexibility | Medium; relies on Firestore database | High | High |
Costs | Depends on Firebase quotas; requires Blaze plan upfront | Depends on Firebase quotas | Depends on the quotas of both Firebase and the cloud email service provider |
Security | High, but may require raw email credentials | Medium; requires passing raw email credentials and depends on external package security | High; depends on external package security but only requires an API key, eliminating the need to pass raw credentials |
Add-ons | Available when used with an email cloud provider | None | Offers email analytics, spam filters, email delivery tracking, and IP blocks |
Still Unsure?
In most scenarios, a cloud email service emerges as the superior choice due to its robust security—eliminating the need to transmit your email credentials directly—and its comprehensive suite of features, including email delivery tracking and spam filters. This is why it is highlighted as the foremost option
Option 1 - Cloud email service
Requirements
- A Firebase Functions project
- A cloud email account, such as SendGrid or MailGun
Setting Up SendGrid
Account Setup: Begin by creating a SendGrid account. Then, register a single sender address from which your emails will be sent.
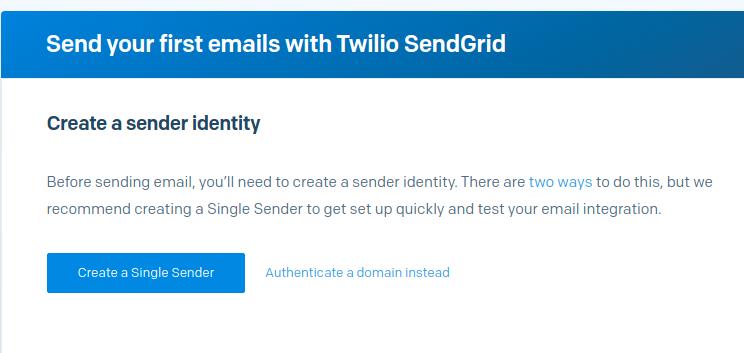
Single Sender Registration: After setting up your account, navigate to the 'Email API' tab and follow the integration guide for the Web API. You will receive a unique API key towards the end of this process. It's advised not to complete the verification process immediately; instead, wait until after you've implemented and deployed your function on Firebase before starting the verification process.
Installing SendGrid on Node.js
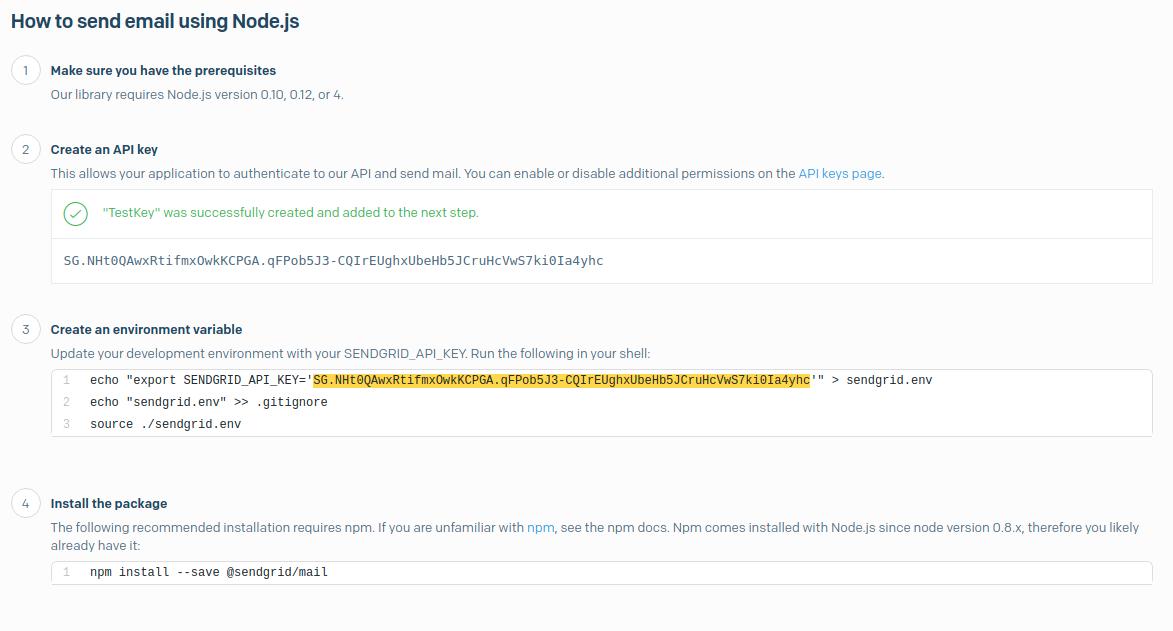
Install Dependencies: In your Firebase project, navigate to the functions directory and install the necessary packages:
npm install --save @sendgrid/mail cors express
Configure API Key: Add your SendGrid API key to the Firebase configuration:
firebase functions:config:set sendgrid.key="YourAPIKey"
Verify the registration of the key:
firebase functions:config:get
Creating an Email Sending Function
In the index.js file, create a function to send emails. Ensure CORS is properly handled to only allow requests from your app domains. For testing purposes, you might temporarily allow all origins with the following CORS setup:
// cors options, only for the testing purposes
const corsOptions = {origin: true}
Implement your function with CORS enabled to block requests outside your app domains. However, for testing, disabling CORS (allowing all origins) might be more convenient.
Here's a template for your email sending function in functions/index.js:
const functions = require('firebase-functions');
const express = require('express');
const sgMail = require('@sendgrid/mail');
const app = express();
const cors = require('cors');

// Specify your domain(s)
const whitelist = ['https://yourDomain.com', 'yourDomain.com'];

const corsOptions = {
    origin: function (origin, callback) {
        if (whitelist.includes(origin)) {
            callback(null, true);
        } else {
            callback(new Error('Not allowed by CORS'));
        }
    }
};

app.get('/', cors(corsOptions), function (request, response) {
    sgMail.setApiKey(functions.config().sendgrid.key);
    const from = 'yourSingleSenderEmailAddress'; // Your verified sender address
    const { to, subject, text } = request.query;
    const msg = {
        to,
        from,
        subject,
        text,
        html: `<strong>${text}</strong>`,
    };
    sgMail.send(msg).then(() => {
        response.status(200).send('Email sent');
    }).catch((error) => {
        response.status(500).send(error.toString());
    });
});

exports.email = functions.https.onRequest(app);
Deploying Your Function
Deploy your function to the cloud with:
firebase deploy
After deployment, note your function's URL from the Firebase console, which should end with the function name, in this case, 'email'
Completing SendGrid Verification
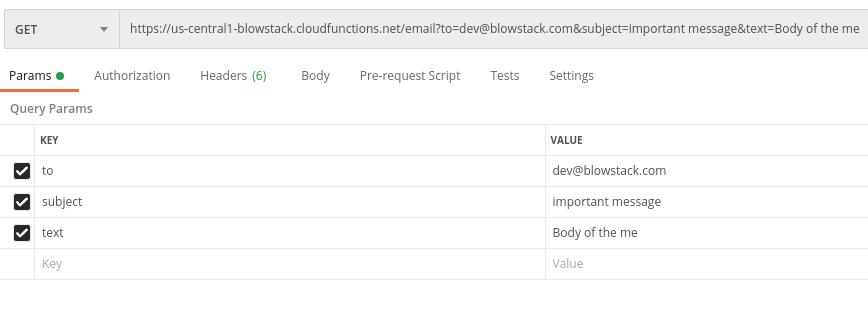
Return to SendGrid to finalize your setup. Using a tool like Postman, submit a test request to your function's URL with the required parameters (subject, to, text) to initiate the verification process. Once successful, you can proceed to accept the verification within SendGrid
Finalizing CORS Settings
After testing, adjust your CORS settings to be more restrictive, as outlined in the initial setup. This prevents unauthorized access to your function endpoint, including from tools like Postman."
Option 2 - SMTP Email Service
Implementing serverless email sending via SMTP is straightforward but may present challenges with restrictive email services, such as Gmail, which requires specific permissions to be granted for SMTP access.
Requirements
- A Firebase Functions project
- Credentials for an email service (e.g., Gmail)
Lifting Gmail Restrictions
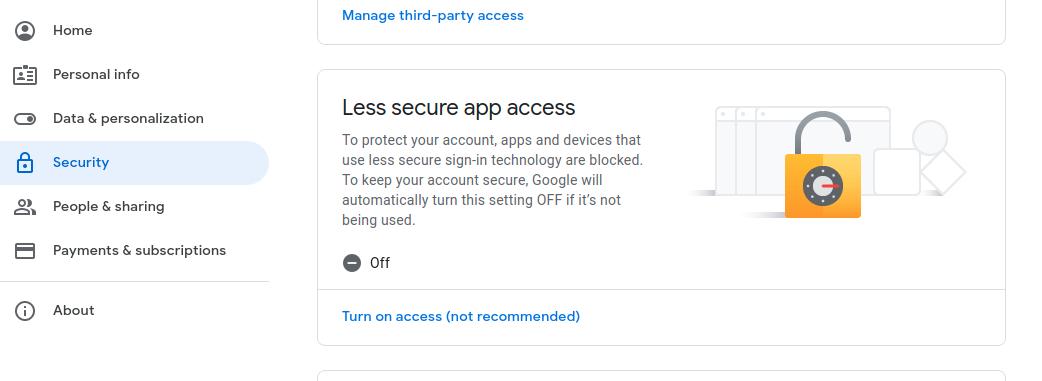
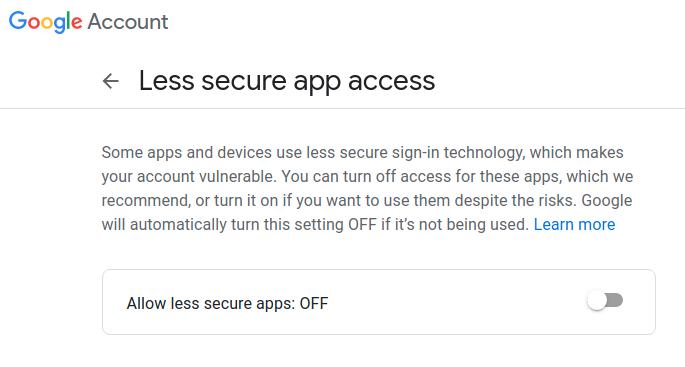
Allow Less Secure Apps: Navigate to your Gmail settings to enable access for less secure apps. This step is necessary to permit email sending via SMTP.
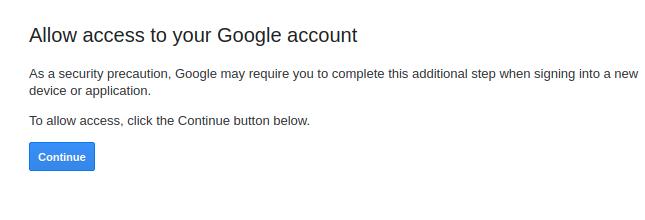
Bypass Google Security Warnings: Upon deploying your code and sending the first message, Google may issue a warning about your app accessing Gmail. Follow Google's instructions to allow this connection.
Disable CAPTCHA Temporarily: You may also need to disable CAPTCHA for your Gmail account to ensure uninterrupted SMTP access.
Installing Dependencies
In your Firebase project's functions directory, install the required packages:
npm install --save nodemailer cors express
Configuring Email Credentials
Add your email credentials to Firebase config:
firebase functions:config:set nodemailer.email="yourEmailAddress@gmail.com"

firebase functions:config:set nodemailer.password="yourEmailPassword"
Verify that the credentials are correctly registered:
firebase functions:config:get
Creating an Email Sending Function
In index.js, create a function to send emails, ensuring CORS is handled appropriately. The default setup blocks requests outside your app domains, but you can allow all origins for testing purposes:
// cors options, only for the testing purposes
const corsOptions = {origin: true}
Below is a template for an SMTP-based email sending function using Gmail. If using another email provider, replace the service name in the transporter configuration.
const functions = require('firebase-functions');
const express = require('express');
const nodemailer = require('nodemailer');
const app = express();
const cors = require('cors');

const whitelist = ['https://yourDomain.com', 'yourDomain.com'];
const corsOptions = {
    origin: function (origin, callback) {
        if (whitelist.includes(origin)) {
            callback(null, true);
        } else {
            callback(new Error('Not allowed by CORS'));
        }
    }
};

const transporter = nodemailer.createTransport({
    service: 'gmail',
    auth: {
        user: functions.config().nodemailer.email,
        pass: functions.config().nodemailer.password
    }
});

app.get('/', cors(corsOptions), function (request, response) {
    const from = 'yourEmailAddress@gmail.com'; // Your email address
    const {to, subject, text} = request.query;
    const msg = {
        to,
        from,
        subject,
        text,
        html: `<strong>${text}</strong>`,
    };
    transporter.sendMail(msg).then(() => {
        response.status(200).send('Email sent');
    }).catch((error) => {
        response.status(500).send(error.toString());
    });
});

exports.email = functions.https.onRequest(app);
Deploying Your Code
Deploy your function to the cloud with:
firebase deploy
After deployment, note the function URL from the console, which you can integrate into your app for email sending functionalities.
Option 3 -Trigger Email
Trigger Email is the least flexible option among those presented, as it sends emails only when data is inserted into one of your Firestore collections. This method can be integrated with either SMTP or cloud email services like SendGrid, with the latter recommended for enhanced security and additional features.
For handling potential Gmail SMTP restrictions, please refer to the earlier sections of this article. When using SendGrid, opt for the SMTP Relay feature in the Email API tab to obtain your SMTP credentials.
Requirements
- A Firebase Functions project
- Credentials for an email or email service provider
- Configured Firestore
- A Firestore collection for emails (automatically created)
- The Blaze plan, which is pay-as-you-go
- Trigger Email extension
- Firebase Admin package
- Optionally, user and template collections (automatically created if needed)
Installing the Trigger Email Extension
In your Firebase project's functions directory, list your projects and their IDs to find the one you'll use:
firebase projects:list
Install the Trigger Email extension and grant it access when prompted:
firebase ext:install firestore-send-email --project=yourProjectId
Configuring the Extension
Function Location
Choose the default location, typically closest to your Firestore database.
SMTP Connection URI:
Use the format smtps://username:password@smtp.hostname.com:port.
For Gmail smtps://username:password1234@smtp.gmail.com - refer to official Gmail SMTP information
For SendGrid smtps://apikey:SG.gs4mYklHTq4nSasadads2adfad@smtp.sendgrid.net - refer to SendGrid SMTP setup guide
Email Documents Collection
Name your email collection.
Default Email Sender
Use an email address associated with your SMTP credentials.
Default REPLY-TO Address
Can be any desired address.
Users Collection (Optional)
Name your user collection if used.
Templates Collection (Optional)
Name your templates collection if used.
Install Required Packages
npm install --save firebase-admin cors express
Create a Basic Email Sending Function
In functions/index.js, create a basic function to send emails through Firestore:
const functions = require('firebase-functions');
const express = require('express');
const admin = require('firebase-admin');
admin.initializeApp();
const app = express();
const cors = require('cors');
const corsOptions = { origin: true };

app.get('/', cors(corsOptions), function (request, response) {
    const { to, subject, text } = request.query;
    try {
        admin.firestore().collection('mail').add({
            to,
            message: {
                subject,
                html: `<p>${text}</p>`,
            },
        });
        response.status(200).send('Email sent');
    } catch (err) {
        response.status(500).send(err.toString());
    }
});

exports.email = functions.https.onRequest(app);
Deploy your code and test the function. The URL will be printed in the console. If using SendGrid, verify your API first, then call the function and accept the verification process:
firebase deploy
After confirming everything works, consider tightening CORS settings for enhanced security, following the guidance provided in the earlier sections for SMTP and Cloud Email Service options.