
How does AWS Session Manager work
AWS Session Manager is one of three dedicated AWS services enabling command line access to an EC2 instance without the need for an SSH key. The other two services are EC2 Instance Connect and EC2 Serial Console.
Unlike traditional methods, Session Manager does not utilize the SSH port for communication. Instead, it uses its own communication channel to send and receive encrypted streams of commands between the EC2 instance and Session Manager, with encryption provided by TLS 1.2. The sessions are authenticated using the Signature Version 4 signing process (Sigv4).
From the user's perspective, the experience is designed to closely resemble that of an SSH connection, despite the underlying differences in technology.
Importantly, the service is available at no additional charge
Supported instances
AWS Session Manager can establish access to instances running Linux, macOS, and Windows operating systems, providing a unified experience for command line access across these platforms. This includes support for Bash shells on Linux and macOS, as well as PowerShell on Windows instances.
While Session Manager is compatible with a wide range of OS images (Amazon Machine Images - AMIs), it's important to verify compatibility with specific versions or configurations. As of the last update, there may be limitations or unsupported scenarios, such as with certain specialized versions of Windows Server. Users should consult the latest AWS documentation for the most current information on supported operating systems and any exceptions.
AWS Session Manager from the AWS console
AWS Session Manager is a feature within AWS Systems Manager, an important detail to be aware of, especially for first-time users accessing Session Manager through the AWS Management Console.
In fact, there are two distinct pathways to initiate a Session Manager session within the AWS console, each differing in functionality and the permissions required for the user attempting to connect:
Connect to instance menu: This option is available directly from the EC2 console, allowing users to start a session with an instance without leaving the EC2 management interface.
Systems Manager menu: Accessing Session Manager from the AWS Systems Manager interface provides additional functionalities, such as starting sessions from within the context of Systems Manager's comprehensive suite of management tools.
Each access path requires specific IAM permissions for the connecting user, emphasizing the need to configure IAM policies appropriately based on the desired access method and functionalities
'Connect to instance' menu
The 'Connect to instance' menu is designed for users who need straightforward access to an EC2 instance without the necessity or permissions to configure Session Manager settings or utilize its advanced features. This method is more accessible, requiring fewer privileges, making it an easier and more direct route for users who simply need to establish a connection to their instance.
However, it's important to note that this option limits users to basic connection capabilities; it does not provide access to the broader functionalities of Session Manager. To use this feature, navigate to the EC2 dashboard, locate the instance list, select the instance you wish to connect to, and click the 'Connect' button. This process offers a simplified way to access instances for users with straightforward needs or limited permissions

Systems Manager menu
Accessing Session Manager through the AWS Systems Manager menu provides comprehensive insights into its features, including:
Current Active Sessions: View sessions that are currently active, allowing for real-time monitoring of user access and activities.
Historical Sessions: Access logs and details of past sessions, useful for auditing and review purposes.
Configuration: Manage and customize Session Manager settings to align with specific security policies and operational requirements.
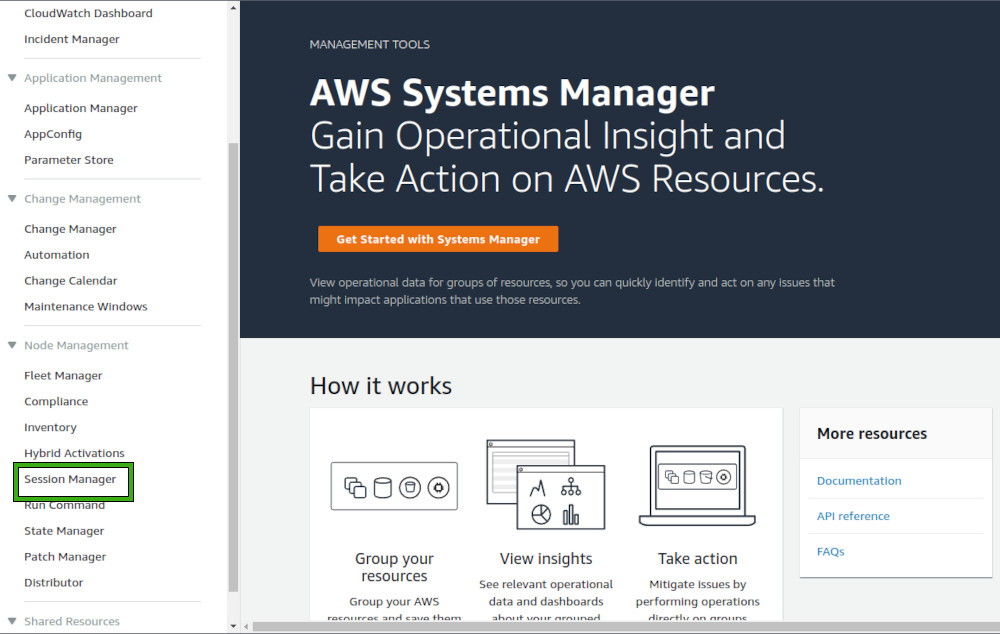
To access these features, navigate to the AWS Systems Manager in the AWS Management Console. Then, select 'Session Manager' from the navigation pane on the left side. This approach not only allows users to initiate and manage sessions but also offers a centralized view for monitoring and configuring various aspects of Session Manager.
AWS Session Manager initiation time
When using Session Manager to access an EC2 instance for the first time after meeting all the necessary requirements, you might experience a brief delay before the connection is established. This delay can vary and is generally shorter, but it's important to note that initial setup processes may contribute to a slightly longer wait time compared to subsequent connections.
During this period, AWS might display information suggesting that the service can't connect to your instance, which could be similar to what you would see before initiating the connection process. This is part of the normal operation as the service prepares your access. Patience during this initial setup phase is advised, as it ensures a secure and properly configured connection to your EC2 instance.
We weren't able to connect to your instance. Common reasons for this include:
- SSM Agent isn't installed on the instance. You can install the agent on both Windows instances and Linux instances.
- The required IAM instance profile isn't attached to the instance. You can attach a profile using AWS Systems Manager Quick Setup.
- Session Manager setup is incomplete. For more information, see Session Manager Prerequisites.
There are no instances which are associated with the required IAM role.
Learn how to create and attach the required IAM role to your instances.
It will take few minutes to show the instances here after attaching the required IAM role.
If you have confirmed that all requirements for accessing an EC2 instance via Session Manager are met but still encounter delays or the interface does not reflect the expected state, do not be concerned. This situation can occur as part of the normal process. The most effective approach in such cases is to patiently wait a short while longer, then refresh the management console page. Often, this simple action can resolve the issue, updating the interface to accurately represent the current state of access to your instance.
Session Manager basic requirements and setup
Setting up AWS Session Manager is generally straightforward. For recently created EC2 instances using the default security group setup, most of the necessary requirements are likely already in place. However, it is important to note that there are specific permissions requirements that may not be automatically configured with a new EC2 instance. These permissions are critical for enabling Session Manager functionality and must be explicitly granted through the appropriate IAM roles and policies.
Permissions requirements
To use AWS Session Manager effectively, two separate sets of permissions need to be configured:
The Connecting User Permissions: These permissions are required for the IAM user or role attempting to initiate a session with an EC2 instance via Session Manager. They enable access to Session Manager features within the AWS Management Console or the AWS CLI.
The EC2 Instance Permissions (Instance Profile): This set of permissions is associated with the EC2 instance itself. It is provided through an instance profile that attaches an IAM role to the instance, granting it the necessary permissions to communicate with Session Manager and other AWS services as required.
Both sets of permissions are crucial for the seamless operation of Session Manager, ensuring secure and authorized access to EC2 instances for management and troubleshooting purposes.
The connecting user permissions
It is a misunderstanding that permissions can be skipped for root or sysadmin users. In AWS, even the root account and users with administrative privileges must explicitly have the necessary permissions to use AWS services, including Session Manager. Therefore, the following IAM policy permissions must be added for any user, including root or sysadmin, to make a successful connection to an EC2 instance through the "Connect to instance" menu:
{
   "Version": "2012-10-17",
   "Statement": [
       {
           "Sid": "1",
           "Effect": "Allow",
           "Action": [
               "ec2:DescribeInstances",
               "ssm:DescribeInstanceInformation",
               "ssm:GetConnectionStatus",
               "ssm:StartSession"
           ],
           "Resource": "*"
       }
   ]
}
These permissions are sufficient for listing EC2 instances and connecting to them. For additional functionalities, such as viewing current and historical sessions without configuring Session Manager, extend the permissions as follows:
{
   "Version": "2012-10-17",
   "Statement": [
       {
           "Sid": "2",
           "Effect": "Allow",
           "Action": [
               "ec2:describeInstances",
               "ssm:DescribeInstanceInformation",
               "ssm:GetConnectionStatus",
               "ssm:StartSession",
               "ssm:ListAssociations",
               "ssm:DescribeSessions",
               "ssm:DescribeInstanceProperties"
           ],
           "Resource": "*"
       }
   ]
}
And for full configuration capabilities, including creating, updating, and deleting Session Manager documents:
{
    "Version": "2012-10-17",
    "Statement": [
        {
            "Sid": "1",
            "Effect": "Allow",
            "Action": [
                "ec2:describeInstances",
                "ssm:DescribeInstanceInformation",
                "ssm:GetConnectionStatus",
                "ssm:StartSession",
                "ssm:ListAssociations",
                "ssm:DescribeSessions",
                "ssm:DescribeInstanceProperties",
                "ssm:CreateDocument",
                "ssm:GetDocument",
                "ssm:UpdateDocument",
                "ssm:DeleteDocument"
            ],
            "Resource": "*"
        }
    ]
}
The EC2 permissions (instance profile)
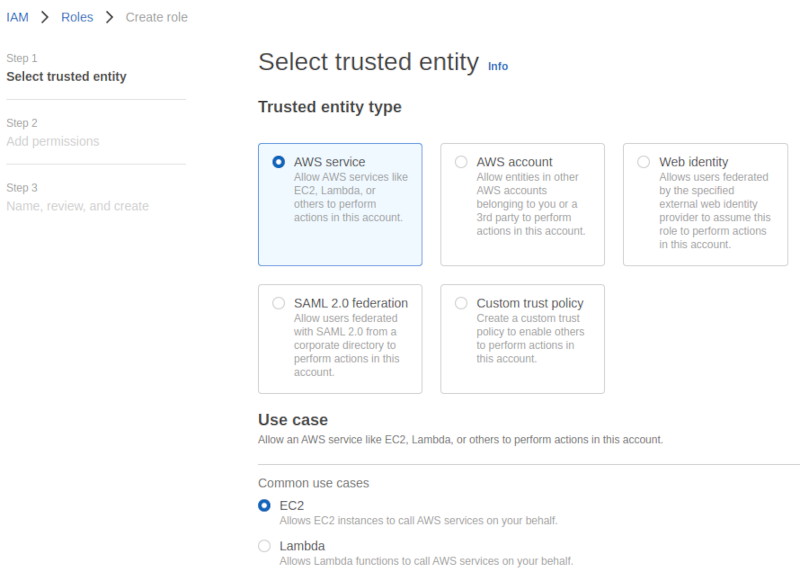
To enable an EC2 instance for Session Manager, it's necessary to create and attach an instance profile with the appropriate permissions. This is done by creating a new IAM role in the AWS Management Console, selecting EC2 as the trusted entity, and attaching the AmazonSSMManagedInstanceCore managed policy.
If the EC2 instance already has a role attached, you may need to update the existing policy with the necessary permissions instead of creating a new one.
{
   "Version": "2012-10-17",
   "Statement": [
       {
           "Effect": "Allow",
           "Action": [
               "ssm:DescribeAssociation",
               "ssm:GetDeployablePatchSnapshotForInstance",
               "ssm:GetDocument",
               "ssm:DescribeDocument",
               "ssm:GetManifest",
               "ssm:GetParameter",
               "ssm:GetParameters",
               "ssm:ListAssociations",
               "ssm:ListInstanceAssociations",
               "ssm:PutInventory",
               "ssm:PutComplianceItems",
               "ssm:PutConfigurePackageResult",
               "ssm:UpdateAssociationStatus",
               "ssm:UpdateInstanceAssociationStatus",
               "ssm:UpdateInstanceInformation"
           ],
           "Resource": "*"
       },
       {
           "Effect": "Allow",
           "Action": [
               "ssmmessages:CreateControlChannel",
               "ssmmessages:CreateDataChannel",
               "ssmmessages:OpenControlChannel",
               "ssmmessages:OpenDataChannel"
           ],
           "Resource": "*"
       },
       {
           "Effect": "Allow",
           "Action": [
               "ec2messages:AcknowledgeMessage",
               "ec2messages:DeleteMessage",
               "ec2messages:FailMessage",
               "ec2messages:GetEndpoint",
               "ec2messages:GetMessages",
               "ec2messages:SendReply"
           ],
           "Resource": "*"
       }
   ]
}
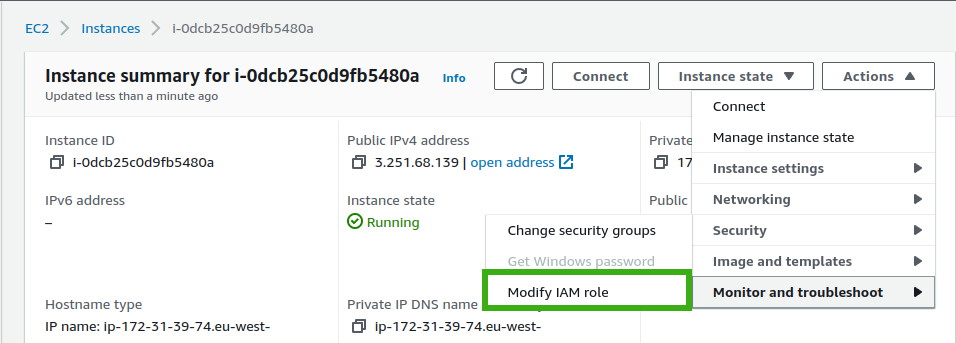
Attaching the role to an EC2 instance is straightforward and can be done from the EC2 instance's detail page by choosing the "Modify IAM role" option from the "Actions" context menu.
Remember, regardless of the user's role within AWS (including root and sysadmin), explicit permissions are required for using Session Manager, underscoring the importance of adhering to the principle of least privilege and ensuring secure, authorized access
EC2 security group
Because Session Manager utilizes AWS's built-in communication channel rather than the traditional SSH protocol, there's no requirement to open any inbound ports on the EC2 instance's security group for Session Manager to function. This simplifies security configurations by reducing the need to expose the instance to the internet directly. However, for outbound communication, it is essential that the instance can reach AWS endpoints.
If you're using the default security group settings, outbound traffic is typically allowed by default, facilitating this communication. If not, ensure that outbound connections are permitted on port 443 (not 433) to the following AWS endpoints (replace 'region' with your actual EC2 region):
ec2messages.region.amazonaws.com
ssm.region.amazonaws.com
ssmmessages.region.amazonaws.com
This configuration allows your EC2 instance to communicate with AWS Systems Manager endpoints securely.
SSM Agent
The AWS Systems Manager (SSM) Agent is pre-installed on many AWS AMIs, including Amazon Linux and some versions of Windows Server. For Session Manager to work, the SSM Agent version must be at least 2.3.68.0.
You can verify the installed version of the SSM Agent on a Linux instance by executing one of the following commands:
yum info amazon-ssm-agent
# or
sudo systemctl status amazon-ssm-agent
The process of installing or updating the SSM Agent varies depending on the operating system and may differ by region. Therefore, for the most current instructions on manually installing or updating the SSM Agent, refer to the official AWS documentation. This ensures you have the latest guidance and steps tailored to your specific AWS region and OS configuration.
How secure is AWS Session Manager
AWS Session Manager provides a highly secure method for accessing your EC2 instances, leveraging AWS's robust authentication and authorization mechanisms. This eliminates the need for SSH keys and does not require any inbound ports to be opened in security groups.
Each session is securely signed with Signature Version 4 (SigV4) and encrypts data in transit using TLS 1.2 by default. Furthermore, monitoring both current and historical sessions is straightforward via the Systems Manager menu in the AWS Management Console or through the CLI.
To further enhance the security of Session Manager, consider implementing the following practices:
Use MFA (Multi-Factor Authentication) for All Users
Enforcing MFA adds an extra layer of security by requiring users to provide two or more verification factors to access AWS resources, significantly reducing the risk of unauthorized access.
Create Least Privileged Users for EC2 Instances
nstead of relying on the default ssm-user, create custom IAM users or roles with the minimum necessary permissions for their intended tasks. This principle of least privilege limits the potential impact of a compromised account.
Specify Instance Access for IAM Users
Clearly define which instances an IAM user can connect to by setting appropriate permissions. This control ensures that users can only access instances necessary for their role, as discussed in the section on connecting user permissions.
Enable KMS Encryption
Use AWS Key Management Service (KMS) to encrypt session data. This provides an additional layer of security for your data at rest and ensures that only authorized users can decrypt the information.
Enable CloudWatch or S3 Logging
Configure Session Manager to log session activity to Amazon CloudWatch Logs or Amazon S3. This allows for auditing and monitoring of session activity, which is critical for detecting potential security incidents or breaches.
Shorten Idle Session Timeout
Configure Session Manager to automatically terminate sessions after a period of inactivity. This reduces the risk of sessions being left open accidentally and potentially exposed to unauthorized users.
Implementing these measures can significantly harden the security of your AWS Session Manager setup, ensuring that your EC2 instances are accessed in the most secure manner possible.
How to change default ssm-user in Session Manager
AWS Session Manager defaults to using the ssm-user with sudo privileges for connections to EC2 instances. Given the elevated privileges of this account, it's prudent to consider if such access levels are necessary for users connecting to your instances
Create a new user
To create a new user with more restricted privileges on your EC2 instance, log into the instance and use the following command:
sudo useradd new_user
By default, this newly created user will not be added to the sudoers file (/etc/sudoers.d/cloud-init) and, as such, will not have sudo privileges.
Define what OS user will use IAM user
There are two methods to specify which EC2 user should be utilized when connecting through Session Manager:
Using Session Manager Preferences (Global)
This approach allows you to set a default OS user for any IAM user connecting through Session Manager. This option can be found under the Systems Manager menu in the AWS Management Console.
Using IAM Tags (Individual)
IAM tags enable you to define or override the default Session Manager user on a per-IAM-user basis. Note that IAM tags will override the settings in Session Manager Preferences.
To enable this, make sure that the “Enable Run As support for Linux instances” option in the Session Manager Preferences is turned on (the user name field can be left empty).

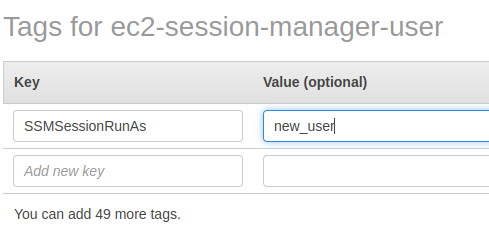
To assign a specific Session Manager user (OS user) to an IAM user, navigate to the IAM user's tags in the IAM console.

Add a new tag with the key SSMSessionRunAs and set the value to the username of the newly created user.
Possible error
If a new user was not created correctly or has been deleted, then the following error will appear:
Your session has been terminated for the following reasons: ----------ERROR------- Unable to start command: failed to start pty since RunAs user new_user does not exist.
The only resolution is to either create a new user or associate a different OS user with the IAM user. Session Manager does not automatically revert to using the default ssm-user if the specified user does not exist or is incorrectly configured
Summary
AWS Session Manager is an exceptional service that provides secure, interactive console access to your EC2 instances using Bash or PowerShell, eliminating the need for the SSH protocol.
It is accessible through the 'Connect to instance' menu, the Systems Manager menu, and the CLI. The service is well-designed, offering not only the capability to connect to EC2 instances but also providing valuable insights into both current and historical sessions.
Additionally, Session Manager is available at no additional charge, though some features might be subject to usage limits. By configuring a specific set of IAM permissions, it's straightforward to grant and manage access to various Session Manager functionalities for IAM users