
How does EC2 instance connect work
EC2 Instance Connect is one of three dedicated AWS services that enable command line access to an EC2 instance without the need for a traditional SSH key; the other two are Session Manager and EC2 Serial Console. EC2 Instance Connect does, however, use its own short-lived SSH keys internally, but these are managed automatically, so you are not required to handle them manually.
Once connected to an EC2 instance, you gain access to a Bash interactive console that offers the same functionality as available through a traditional SSH client.
A notable feature of EC2 Instance Connect is the authentication method. Instead of using SSH keys, it authenticates users through AWS Identity and Access Management (IAM), simplifying access management significantly. This approach is more manageable because access is linked to IAM users rather than distributed SSH keys, which can be issued by anyone.
Additionally, EC2 Instance Connect is a free service, incurring no additional costs for its use.
EC2 instance connect from the AWS console
The EC2 Instance Connect service can be accessed through the 'Connect' menu in the AWS Management Console. There are several ways to reach it. One common method is by navigating to the list of EC2 instances. From there, you can simply click on the 'Connect' button associated with the specific instance you wish to access

On the new page, EC2 Instance Connect is often presented as the first option by default. However, its availability depends on the operating system of the EC2 instance. It is only supported if you are using Amazon Linux 2 or Ubuntu 16.04 LTS distributions or later versions.
If your instance runs on an unsupported operating system, EC2 Instance Connect will not be available as an option.
EC2 instance connect basic requirements and setup
If you are able to connect successfully, you can skip the following sections titled 'Task'. However, it's common to encounter an error on your first attempt to connect, typically related to one of four specific 'Tasks'.
This issue arises because there are certain prerequisites that must be met to use EC2 Instance Connect effectively. There are four main tasks to complete (or three, if you choose to use the AWS console exclusively and avoid the CLI).
This post primarily addresses the standard use case where users connect to their EC2 instance using public IP addresses, presented in a simplified and concise format. For those who need more detailed guidance on fulfilling these prerequisites, or for those who wish to connect using private IP addresses, it is advisable to consult the official AWS documentation.
Task 1 - set up network access (public IP)
If Task 1 is not completed successfully, then when you attempt to connect to your EC2 instance, you will encounter an error message like the following (or similar):
Failed to connect to your instance
We were unable to connect to your instance. Make sure that your instance network settings are configured correctly for EC2 Instance Connect. For more information, check Task 1 under the Set up EC2 Instance Connect AWS documentation.
To effectively use EC2 Instance Connect, it is essential to have properly configured network access that facilitates the connection between the service and the EC2 instance. This setup is somewhat similar to connecting via a direct SSH client, where you must specify the host, user, and ensure appropriate firewall rules are in place.
A key difference with EC2 Instance Connect is that it eliminates the need for managing SSH keys. First, let's focus on configuring the host.
Host
First, verify whether a public IP address is already associated with your EC2 instance. You can do this by checking the EC2 instance list or the details page of the specific EC2 instance in the AWS Management Console. If you did not explicitly disable the 'Auto-assign Public IP' feature during the creation of the EC2 instance, then your instance should already have a public IP address, and you can proceed to the next requirement.
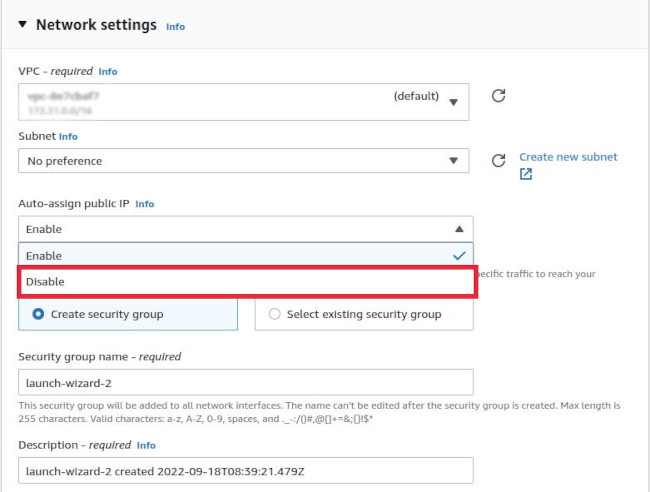
If a public IP address was not automatically assigned to your EC2 instance at launch, and you need one, there are several options to consider. However, automatically assigning a public IPv6 address to an already launched EC2 instance is only possible if both the VPC and the subnet have an IPv6 CIDR block assigned, which is not the default configuration. For detailed instructions on assigning an IPv6 address to an instance post-launch, refer to the official AWS documentation.
Another alternative is to create an image of your EC2 instance and then launch a new instance from this image, ensuring you enable the 'Auto-assign Public IP' option during the process.
If neither of these options is suitable, a viable alternative is to allocate an Elastic IP address and associate it with your instance. This can be done by attaching the Elastic IP to the network interface of the EC2 instance, which is accessible through the 'Manage IP Addresses' option in the context menu of the 'Networking' tab on the EC2 instance detail page.
It's important to note that while the auto-assign public IP options are free, using an Elastic IP address may incur additional costs if it is not associated with a running instance or if it exceeds AWS's limit on idle Elastic IPs.
Security group (firewall rules)
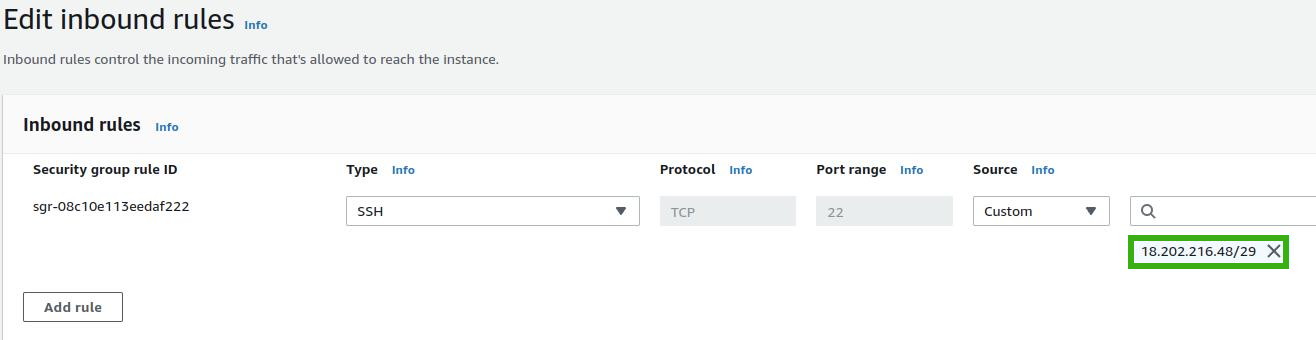
The next step is to configure your security group to allow connections to EC2 instances using the SSH protocol. If your security group’s inbound rules for SSH (port 22) are set to accept connections from 'Anywhere-IPv4', then EC2 Instance Connect will work. However, this setting effectively disables the firewall for SSH connections, which is not recommended for security reasons.
A more secure approach is to specifically allow IP addresses used by the EC2 Instance Connect service. To find these IP ranges, visit the AWS IP ranges page and use the search function (Ctrl+F) to find entries with 'EC2_INSTANCE_CONNECT' as the service name. When adding these IP ranges to your security group rules, ensure that you select the ranges corresponding to the 'network_border_group' that matches the region of your EC2 instance's network interface.
For instance, if your instance is in the 'eu-west-1c' availability zone, look for entries with 'eu-west-1' in their network_border_group. An example entry for 'eu-west-1' would look like this:
    {
      "ip_prefix": "18.202.216.48/29",
      "region": "eu-west-1",
      "service": "EC2_INSTANCE_CONNECT",
      "network_border_group": "eu-west-1"
    }
You should end up with the following entry in the inbound rules of your security group:
Task 2 - installing EC2 instance connect agent
If Task 2 is not properly completed, you will encounter an error message. Note that, unlike other scenarios, the error message in this case does not specify the task number:
Failed to connect to your instance
Error establishing SSH connection to your instance. Please wait and try again later
If the required EC2 Instance Connect agent is missing on your instance, the only solution is to manually connect to the EC2 instance using a standard SSH client and install the necessary packages. For example, if you're using Ubuntu Server 18.04, which does not come with the EC2 Instance Connect agent pre-installed, and you no longer have access to the required SSH key, you will be unable to use EC2 Instance Connect.
To resolve this, first connect to your instance using a standard SSH client. Once logged in, update the package list and upgrade the system. Then, install the EC2 Instance Connect agent. Below are the commands you should use for Amazon Linux and Ubuntu operating systems, respectively:
sudo yum install ec2-instance-connect
sudo apt-get install ec2-instance-connect
Task 3 - install CLI
There will not be an error specifically related to Task 3, as this step is not mandatory for EC2 Instance Connect functionality. Task 3 pertains to the use of the AWS Command Line Interface (CLI), which is optional since you can alternatively use the AWS Management Console. However, if you choose to use the AWS CLI, you'll need to install the necessary Python package for EC2 Instance Connect.
Additionally, it's important to update your security group to include your IP address for SSH connections. This ensures that your connection through the CLI is authorized and secure.
Task 4 - user permissions
When using EC2 Instance Connect, whether from the CLI or the AWS Management Console, you are authenticating through the AWS Identity and Access Management (IAM) system, not directly via an SSH client. This process requires that certain permissions be granted to the IAM user attempting access. If these permissions are not correctly configured, you can expect to encounter errors. The specific errors that may appear will depend on which required permissions are missing or improperly set.
An error occurred (UnauthorizedOperation) when calling the DescribeInstances operation: You are not authorized to perform this operation.
Failed to connect to your instance
Access denied by EC2 Instance Connect. Either your AWS credentials are not valid or you do not have access to the EC2 instance.
To rectify these errors, you need to add specific permissions to the IAM user. This can be done by updating the user's permissions policy with the JSON configuration provided below.
When doing so, it's crucial to replace the placeholders for 'region', 'accountId', 'instanceId', and the 'ec2:osuser' value with your actual instance's region, AWS account ID, instance ID, and the username of the instance, respectively.
It's important to note that the default value for 'ec2:osuser' is 'ec2-user' for Amazon Linux AMIs and 'ubuntu' for Ubuntu AMIs. Here is the JSON template for the permissions:
{
    "Version": "2012-10-17",
    "Statement": [
      {
        "Effect": "Allow",
        "Action": "ec2-instance-connect:SendSSHPublicKey",
        "Resource": [
            "arn:aws:ec2:{region}:{accountId}:instance/{instanceId}"
        ],
        "Condition": {
            "StringEquals": {
                "ec2:osuser": "{"ec2-user | ubuntu | differentNotDefaultUserName}"
            }
        }
      },
      {
        "Effect": "Allow",
        "Action": "ec2:DescribeInstances",
        "Resource": "arn:aws:ec2:{region}:{accountId}:instance/{instanceId}"
      }
    ]
}
Additionally, it's important to note that beyond the specific permissions required for EC2 Instance Connect, your IAM user must also have 'Programmatic access' enabled if you intend to use the AWS Command Line Interface (CLI).
Similarly, if you plan to interact with EC2 Instance Connect through the AWS Management Console, your IAM user needs to have 'AWS Management Console access' granted. These access types are essential for ensuring that the user can interact with AWS services either via the CLI or the Console, as appropriate.
How secure is EC2 instance connect
EC2 Instance Connect offers enhanced security compared to traditional SSH clients. The key reason is that all authentication and authorization processes are managed by AWS Identity and Access Management (IAM), aligning the security of accessing your EC2 instance with the robust security measures of AWS itself.
To further enhance the security of EC2 Instance Connect, consider the following practices:
Enable Multi-Factor Authentication (MFA)
This adds an additional layer of security, and is recommended for both AWS Management Console and CLI access.
Integrate with AWS CloudTrail
By using CloudTrail, you can monitor and log who accessed your EC2 instances, when they did so, and what actions they performed. This aids in auditing and identifying unauthorized access.
Use Least Privilege SSH Users
Instead of relying on default root users (like 'ec2-user' or 'ubuntu'), create SSH users with minimal necessary privileges. This reduces the risk of extensive damage if a user account is compromised.
Assign Separate SSH Users for Each AMI Connecting User
This practice helps in tracking and controlling individual user activities, enhancing accountability and security.
Restrict Security Group Access
Avoid using '0.0.0.0/0' in your EC2 security group rules. Instead, specify the exact IP addresses used by EC2 Instance Connect (as mentioned in Task 1) to limit access to authorized sources only.
Specify Instance ARNs and Usernames in User Permissions
When setting up IAM permissions (as outlined in Task 4), be specific about the instance ARNs and user names to ensure that permissions are tightly controlled and access is granted only to the intended entities."
These steps can significantly strengthen the security posture of your EC2 instances, making them less vulnerable to unauthorized access and potential threats.
Summary
EC2 Instance Connect is a valuable AWS service that simplifies SSH connections, primarily for Amazon Linux and Ubuntu instances. It conveniently abstracts the complexity of managing SSH keys, although they are still utilized internally. However, it's important to enhance security measures. This includes enabling Multi-Factor Authentication (MFA) and considering the creation of new, non-sudo privileged SSH users for each IAM user who needs access to an EC2 instance.
While EC2 Instance Connect primarily supports Amazon Linux and Ubuntu, it's worth noting that with some configuration, it can be extended to other Linux distributions as well.