
This serverless Zoho CRM authentication guide is tailored for Firebase Functions using Node.js. By the end of this article, you will learn how to leverage serverless functions for authentication using OAuth 2.0, as well as how to make straightforward calls using the Node.js SDK.
To carry out authentication, you must activate the Blaze plan in your Firebase account. Additionally, we provide a straightforward solution for obtaining the Blaze plan at no cost.
Prepare environment for Firebase functions
If you're already versed in creating Firebase functions, you might want to skip ahead to the subsequent section.
Start by finding a suitable location on your system to set up a new project for Firebase functions. Following that, install the necessary official Firebase tools globally with:
npm install -g firebase-tools
Then, initiate a Firebase project using the newly installed tools:
firebase init
When prompted, select the "Functions: Configure and deploy Cloud Functions" option by pressing space.

Firebase will then guide you through initializing a project. You can either select an existing project (if your app is already hosted on Firebase, it's advisable to choose that project, though it's not mandatory) or create a new one. You will be asked to log in for authentication. Upon successful login, your Firebase project will be set up.
Open the project in your IDE; the core directory is named functions, which is where you'll be working to create new functions. If using an IDE console, switch to this directory. Otherwise, remember to execute any console command from within this directory.
Install Node.js SDK for Zoho CRM
Installing the official Zoho SDK is beneficial for handling authentication and API calls. Install the SDK in the functions directory:
npm install zcrmsdk
Then, in the index.js file, require this module and add the configuration object:
// functions/index.js

const functions = require('firebase-functions');
const ZCRMRestClient = require('zcrmsdk');

const config = {
  "client_id": "your_client_id_here",
  "client_secret": "your_client_secret_here",
  "redirect_url": "http://your_redirect_url_here",
  "user_identifier": "your_user_identifier_here",
  "tokenmanagement": "zohoAuth"
};
Replace the placeholders in the config object with your actual data. If you're unsure where to find these values, refer to my previous post on Zoho CRM authentication in Node.js for guidance.
The tokenmanagement value is crucial; it should reference an object that implements three functions required by the SDK for token management. Next, you'll create these functions and encapsulate them into a Node module.
Create oauth.js file
Inside the functions directory, create a subdirectory, for example, zohoAuth, and within it, create a file named oauth.js with the following content:
// functions/zohoAuth/oauth.js

let file_persistence = {};

const admin = require('firebase-admin');
admin.initializeApp();

const db = admin.firestore();

file_persistence.saveOAuthTokens = function (tokenobject) {
    return new Promise(function (resolve, reject) {
        let tokens = {}

        db.collection('zoho').doc('tokens').update({
            access_token: tokenobject.access_token,
            expires_in: tokenobject.expires_in,
            refresh_token: tokenobject.refresh_token,
        })
            // eslint-disable-next-line promise/always-return
            .then(function (docRef) {
                resolve()
            })
            .catch(function (error) {
                console.error("Error adding document: ", error);

            })
    })
}

file_persistence.getOAuthTokens = function (user_identifier) {
    return new Promise(function (resolve, reject) {
        let tokens = {}

        // eslint-disable-next-line promise/always-return
        db.collection('zoho').doc('tokens').get().then((snapshot) => {
            let data = snapshot.data()
            tokens.access_token = data.access_token
            tokens.refresh_token = data.refresh_token
            tokens.expires_in = data.expires_in
            resolve(tokens)
        }).catch((err) => {
            console.log(err)
            resolve()
        })

    })
}

file_persistence.updateOAuthTokens = function (tokenobject) {
    return new Promise(function (resolve, reject) {

        db.collection('zoho').doc('tokens').update({
            access_token: tokenobject.access_token,
            expires_in: tokenobject.expires_in,
        })
            // eslint-disable-next-line promise/always-return
            .then(function (docRef) {
                resolve()
            })
            .catch(function (error) {
                console.error("Error adding document: ", error);

            })
    })
}

module.exports = file_persistence;
This implementation leverages the Firebase database for token management, with no need for separate authentication values as it operates within Firebase servers.
Change to the zohoAuth directory and generate a package.json file:
npm init -y
Ensure the package.json file reflects zohoAuth as the name value. Then, return to the functions directory and create a local Node module from the zohoAuth folder:
npm install --save ./zohoAuth
Your configuration object now references an existing module. Should you need to modify the functions in the future, do so within the zohoAuth directory inside the functions folder, not in the node_modules directory.
Create a new collection
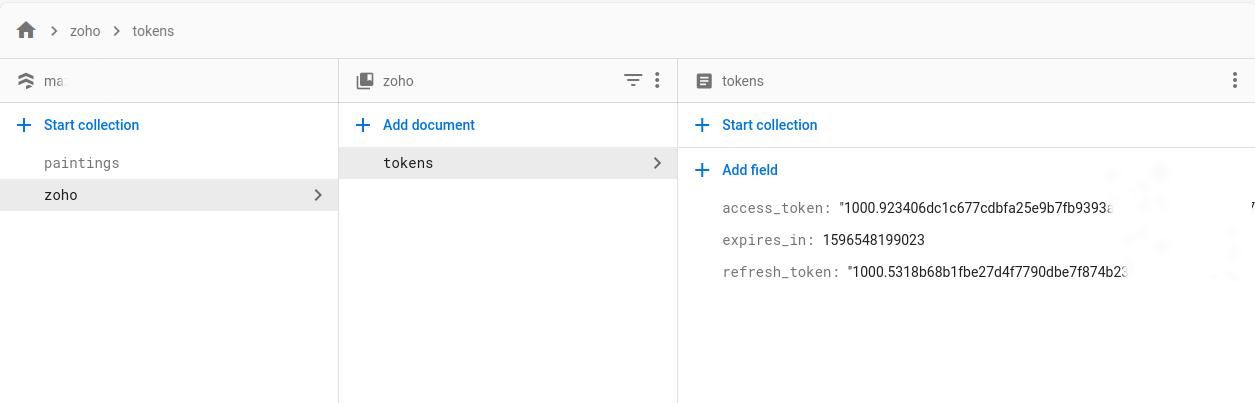
The module you created references a non-existent database document and collection. To rectify this, navigate to the Firebase console, access the database tab, and create a new collection named zoho with a document named tokens. This document should have three empty fields for access_token, expires_in, and refresh_token.
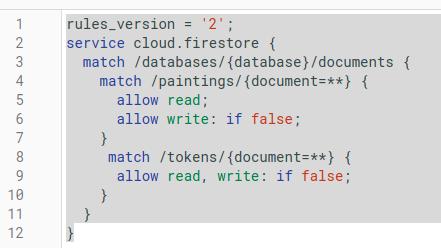
Adjust Firestore and Firebase rules as necessary to ensure security and proper access management.
Create a function for serverless authentication
It's time to consolidate everything into a Firebase function that generates access tokens for us. Navigate to the index.js file and insert the following code:
// Add this at the top of your index.js file
const functions = require('firebase-functions');
const ZCRMRestClient = require('zcrmsdk');

// Your existing configuration object
// Ensure your config object is defined above this function

exports.renderTokens = functions.https.onRequest((request, response) => {
    const grant_token = request.query.grant_token;

    ZCRMRestClient.initialize(config).then(() => {
        ZCRMRestClient.generateAuthTokens(config.user_identifier, grant_token).then((auth_response) => {
            console.log("Access token: " + auth_response.access_token);
            console.log("Refresh token: " + auth_response.refresh_token);
            console.log("Expires in: " + auth_response.expires_in);
            response.send('Tokens generated successfully');
        }).catch((error) => {
            console.error(error);
            response.status(500).send('Error generating tokens');
        });
    }).catch((error) => {
        console.error(error);
        response.status(500).send('Error initializing ZCRMRestClient');
    });
});
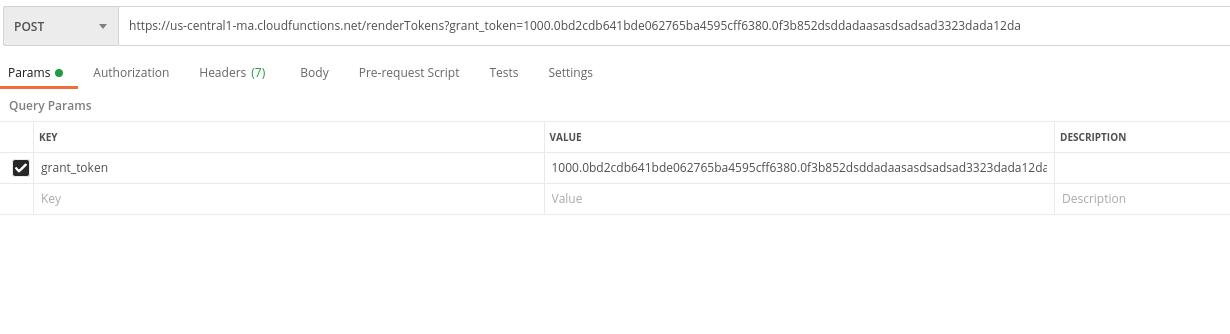
This implementation straightforwardly uses the SDK to generate tokens. The zohoAuth functions ensure the token management process is fully covered. Test this function using tools like Postman to verify token generation. Before testing, deploy your Firebase function using:
firebase deploy
After deployment, you'll receive a Function URL. Use this URL in Postman to test token generation. Remember to generate a grant token beforehand. If you're unfamiliar with this process, please revisit the previous article on Zoho CRM Node.js implementation for guidance. In Postman, make a request and include a parameter named grant_token with your previously generated grant token as its value. It may take some time for the tokens to generate, so check back after a few minutes to see if the database document has been updated. Proceed to test the API using an example call if the document has been updated.
Create a lead function
Next, let's create another function to verify our service's ability to insert data into Zoho CRM. Add the following code to your index.js file:
// functions/index.js

...

exports.lead = functions.https.onRequest((request, response) => {
    ZCRMRestClient.initialize(config).then(() => {
        let input = {
            module: 'Leads',
            body: {
                "data": [{
                    "First_Name": 'First Name Example',
                    "Last_Name": 'Last Name Example',
                    "Email": 'example@example.com',
                    "Description": 'Sample description',
                }]
            }
        };

        ZCRMRestClient.API.MODULES.post(input).then((apiResponse) => {
            console.log(apiResponse);
            response.send('Lead created successfully');
        }).catch((error) => {
            console.error(error);
            response.status(500).send('Error creating lead');
        });
    }).catch((error) => {
        console.error(error);
        response.status(500).send('Error initializing ZCRMRestClient for lead creation');
    });
});
Deploy your code to Firebase and use the URL in Postman to call the function. Later, check your Zoho CRM account to confirm the lead's insertion.
This guidance helps you understand how to authenticate and make API calls to Zoho CRM using a serverless environment, setting a foundation for expanding functionality with additional functions. Remember, Postman doesn't enforce CORS by default, so your calls won't be blocked, but this might not be the case with your app. In such instances, ensure to pass the correct headers to allow requests from the Firebase domain.