There is also a serverless authentication version for Node.js environment.
Zoho CRM SDK Installation
Install the official Zoho SDK for Node.js.
Open the console, go to the folder where your app resides and type the following command:
npm install zcrmsdk

 // or using yarn

 yarn add zcrmsdk
Before using API you are obliged to register and use a Zoho client.
It's an easy process just go to the Zoho console and login into your account.
There are multiple ways to register a new client. During this post we will stick to self-client.

Self-client is enough to integrate Zoho CRM system in a way that your web/mobile app handles all the communication without need to authenticate other users. In other words your app will be the client / user. This will enable you to fully use all the available modules and functionality through the backend.
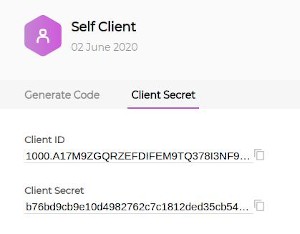
After registering a client there will be two tabs, don't fill the form in the Generate Code tab yet. We will only need automatically generated data from the Client Secret tab at the moment.
Having Client ID and Clients secret we can proceed to the SDK configuration stage.
Zoho CRM SDK Configuration
First you have to consider where you want to keep your authorization tokens. There are two possibilities:
- in file (recommended)
- in database
SECURITY NOTICE
For security reasons I strongly discourage you to save tokens in a database thus we will cover only persistence in a file.
Create a Zoho folder in the root of your app. Then in this folder create a folder named config. Next create a file with token management methods, name it oauth.js and put it into Zoho folder. Paste the code presented below into this file (it's a fixed version of the code presented on the Zoho website, it had a buggy refreshing token process so after 60 minutes your service stopped working at all) You have to change only one variable: user email. Put your email used when registering at Zoho. Optionally you can change tokens_path if you want to store your generated tokens somewhere else.
// /Zoho/oauth.js

const fs = require('fs');
const path = require('path');
let file_persistence = {};
const tokens_path = path.join(__dirname, './zoho_config/zcrm_oauthtokens.txt');
const user_email = 'dev@blowstack.com';

file_persistence.saveOAuthTokens = function(tokenobject){
  return new Promise(function(resolve,reject){
    file_persistence.updateOAuthTokens(tokenobject).then(function(){
      resolve();
    })
  })
}

file_persistence.getOAuthTokens = function(user_identifier) {
  return new Promise(function (resolve, reject) {
    let found = 0;
    let tokens = {}

    if (fs.existsSync(tokens_path)) {
      let token_as_string = fs.readFileSync(tokens_path, 'utf8');
      tokens = JSON.parse(token_as_string);


      for (let token in tokens.tokens) {
        if (tokens.tokens[token].user_identifier == user_identifier) {
          found = 1;
          resolve(tokens.tokens[token]);
        }
      }

      if (found == 0) {
        resolve();
      }
    }
  })
}

file_persistence.updateOAuthTokens = function(tokenobject){
  return new Promise(function(resolve,reject){
    let tokens = {}
    if (fs.existsSync(tokens_path)){
      let token_as_string = fs.readFileSync(tokens_path, 'utf8');
      tokens = JSON.parse(token_as_string);

      for(let token in tokens.tokens){
        if(tokens.tokens[token].user_identifier === user_email) {
          tokens.tokens[token].access_token = tokenobject.access_token
          tokens.tokens[token].expires_in = tokenobject.expires_in
        }
      }
      tokens.tokens.push(tokenobject);
    }
    else{
      tokens.tokens = [tokenobject]
    }

    let token_as_string = JSON.stringify(tokens);

    fs.writeFile(tokens_path, token_as_string, function (err) {
      if (err) throw err;
      resolve();
    });
  })
}

module.exports = file_persistence;
We need a configuration file so create a file named config.json in the config folder and fill it with your data. Copy and paste client id and client secret from the newly registered client (Client Secret tab).

Redirect uri has to be filled but it can be a dummy url as we use self client and it's not really needed here. For currentUserEmail field pass your email address used in Zoho developer console. In token management path pass the absolute path to the oauth.js file.
{
 "client_id":"1000.A17M9ZGQRZEFDIFEM9TQ378I3NF9PH",
 "client_secret":"b76bd9cb9e10d4982762c7c1812ded35cb54d5404f",
 "redirect_url":"http://dummy_address.com",
 "user_identifier":"dev@blowstack.com",
 "tokenmanagement":"/home/blowstack/Projects/boilerplates/zoho_crm_node/Zoho/oauth.js"
}
I cover two implementations for Adonis.js and Express.js frameworks respectively so you can just copy and paste the code if you happen to use one of them.
Zoho CRM implemenation in Adonis.js
Make a new controller for token generation and name it ZohoOauthController. Paste the below data to the controller. Double check if the config variable stores a valid path to the config.json file. Currently it points at the zoho_config folder in the root, adjust it if needed.
// app/Controllers/Http/Admin/ZohoOauthController.js

'use strict'

const ZCRMRestClient = require('zcrmsdk')
const config = require('../Zoho/zoho_config/config.json')


class ZohoOauthController {

  async generateTokens({request}) {

    const grant_token = request.only(['grant_token']);

    try {
      ZCRMRestClient.initialize(config).then(function () {
        ZCRMRestClient.generateAuthTokens(config.user_identifier, grant_token).then(function (auth_response) {
          console.log("access token :" + auth_response.access_token);
          console.log("refresh token :" + auth_response.refresh_token);
          console.log("expires in :" + auth_response.expires_in);
        });
      })
    } catch (e) {
      console.log(e)
    }
  }
}

module.exports = new ZohoOauthController()
The last thing before initiating the process of generating tokens is create a route to the controller.
// start/routes.js

Route.group(() => {

  //Zoho CRM generate tokens
  Route.post('/crm/generate/tokens', 'Admin/ZohoOauthController.generateTokens');

}).prefix('admin/api').middleware('auth');
As you see the route is behind the auth module which is extremely desired on the production environment so only authorized apps and users can initiate the process. Setting up auth middleware is out of scope of this post so you can delete the following code .middleware('auth') if you haven't set it up yet.
Zoho CRM implementation in Express.js
Create a new route i.e. zohoAuthentication.js and use SDK to generate tokens. You should use post methods.
// routes/zohoAuthentication.js

var express = require('express');
var router = express.Router();

const ZCRMRestClient = require('zcrmsdk')
const config = require('../Zoho/zoho_config/config.json')

/* GET home page. */
router.post('/', function(req, res, next) {

        const grant_token = req.query.grant_token;

        try {
            ZCRMRestClient.initialize(config).then(function () {
                ZCRMRestClient.generateAuthTokens(config.user_identifier, grant_token).then(function (auth_response) {
                    console.log("access token :" + auth_response.access_token);
                    console.log("refresh token :" + auth_response.refresh_token);
                    console.log("expires in :" + auth_response.expires_in);
                });
                res.send(res);

            })
        } catch (e) {
            console.log(e)
            res.send(res);
        }
});

module.exports = router;
Next add this route to the app.
...
var zohoAuthenticationRouter = require('./routes/zohoAuthentication');
...
app.use('/admin/api/crm/generate/tokens', zohoAuthenticationRouter);
...
Access and Refresh Token generation
The Controller and the route has been set up so it's time to generate our tokens but first you need a grant token in order to generate other tokens like access token and refresh token. The good news is it's only a one time process so let's finish it up now! Get back to the zoho developer console.

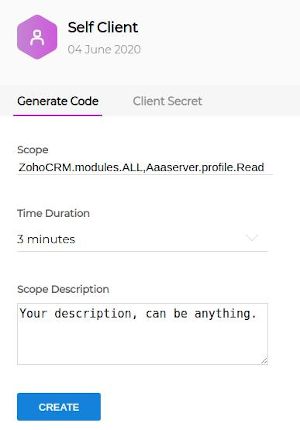
There is a Generate Code tab in the self client option . Fill the form in the following way.
Scope*
ZohoCRM.modules.ALL, Aaaserver.profile.Read
(there can't be spaces between commas separating scope names!)
Time duration
3 minutes
Scope description
All
*reconsider this scope in the production environment. Those two give you minimal access needed to generate tokens and make all API calls related to modules which should be enough in most cases though.
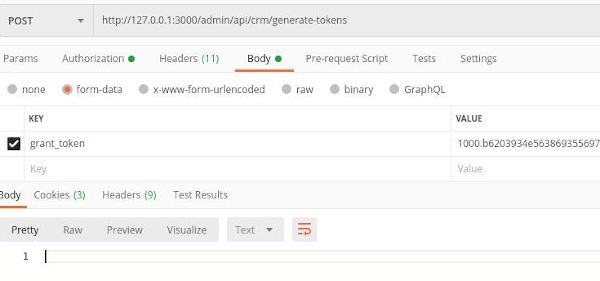
Having grant_token makes a post call to the controller with its value. The best way to do that is using some software like Postman.

If all went well a file named zcrmoauthtokens.txt will be created in Zoho/zohoconfig folder and filled with data . From now on this will be fully automatic process.
