
This post focuses on creating a custom build of CKEditor 5, assuming you have already integrated a standard build into your application. If you haven't yet integrated a standard build, please refer to existing posts that explain how to incorporate the classic build into various JavaScript frameworks.
How to create a custom build of CKEditor 5
Upon integrating CKEditor into your app, you might find it lacking in basic functionalities, such as alignment or font color options, making the basic build somewhat limited. The primary method to enhance its capabilities is through the addition of new plugins, which necessitates the creation of a custom build. This process can be challenging for many developers.
The CKEditor team has introduced an online builder as a partial solution, which facilitates the creation of a custom build quickly. However, this approach has a significant drawback for production use: builds created via the online builder cannot be updated through Git, preventing you from tracking updates made by the CKEditor authors.
Therefore, it's recommended not to rely solely on the online builder for creating your build. This guide will demonstrate how to link your custom build with the official production branch, with occasional references to the online builder for assistance.
Choosing the editor type
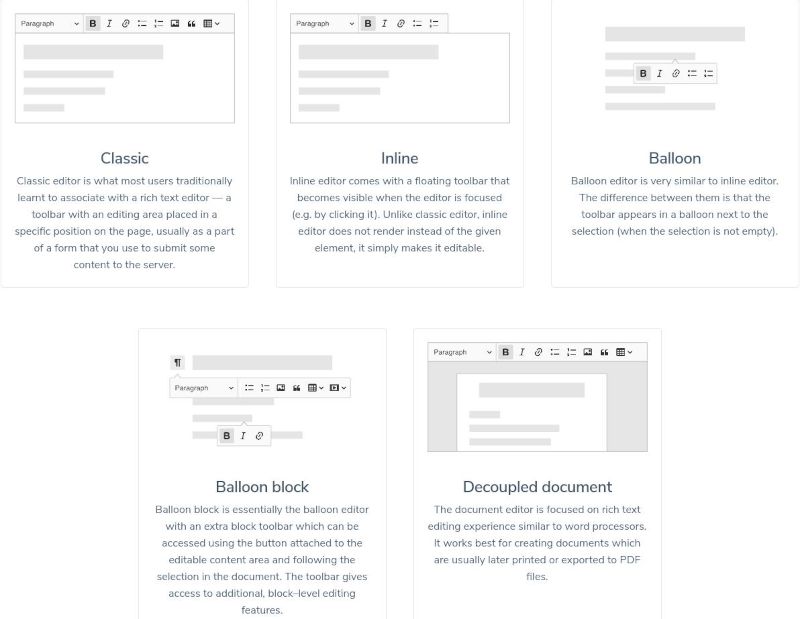
The initial step is to decide on the type of editor you require. CKEditor 5 offers five official builds:
- Classic
- Inline
- Balloon
- Balloon Block
- Decoupled Document
If you're uncertain about which build suits your needs, the online builder is a helpful resource for exploration. For now, select an editor type or opt for the classic build, which meets most users' needs. This choice is primarily about the editor's appearance and functionality, not its extensibility through plugins.
Forking the Official Repository
After choosing an editor type, visit the official GitHub repository and navigate to the packages folder, which contains all official plugins and builds. If you've chosen the classic build, for example, fork the repository containing ckeditor5-build-classic. Initially, you must fork the entire framework.
git clone <your-forked-repo.git>
Then, navigate to the framework's root folder to isolate your chosen editor type, such as ckeditor5-build-classic, by changing to the specific build directory. It's crucial to work within this directory when customizing your build. Before making any modifications, create and switch to a new branch, named, for example, mycustombuild.
cd ./packages/ckeditor5-build-classic
All the subsequent changes of the forked repo will be done in this folder and it's super important that you stick with this folder anytime working on your build. Before making any changes remember to create and checkout into your branch named for example mycustombuild. Then you can start making customisations.
cd ./packages/ckeditor5-build-classic
git checkout -b mycustombuild
Adding Plugins
To discover available plugins and their integration, utilize the official CKEditor 5 online builder. This tool lets you select plugins and generates a custom build. After creating a build with the online builder, locate the ckeditor.js file in the src folder of the downloaded build. Copy all import statements from this file to your local forked repository, register the plugins, and add them to the toolbar. For instance, to include the Alignment plugin, add the following lines to your ckeditor.js file and install the plugin via npm or yarn:
import Alignment from '@ckeditor/ckeditor5-alignment/src/alignment.js';

ClassicEditor.builtinPlugins = [
    Alignment,
    // other plugins
];

ClassicEditor.defaultConfig = {
    toolbar: {
        items: [
            'alignment',
            // other toolbar items
        ],
    },
};
npm install @ckeditor/ckeditor5-alignment
Repeat these steps for any additional plugins you wish to include. Feel free to make other modifications, such as removing default packages or adding custom plugins or buttons, before finalizing your changes. Once completed, install all dependencies specified in package.json with:
npm installGenerating Your Custom Build
To create your custom build, execute the following command. This generates a build folder containing essential files, essentially your entire customized editor.
npm run build
Next, navigate to the application where you intend to use your newly created custom build. Assuming you're already utilizing a CKEditor build there, simply replace the ckeditor.js file from your forked repository's build version with the corresponding file in the node_modules directory of your target application.
This method directly replaces the official build's content, which works until the next project package update. During such updates, npm or Yarn will overwrite the modified content with the original. To avoid this, consider creating your own npm package for installation and updates, preserving your custom changes.
After verifying everything functions correctly, commit and push your changes:
git add .
git commit -m "Added alignment plugin"
git push origin mycustombuild
How to use the CKEditor 5 custom build
To use your custom build within your application, it must be installed in node_modules. There are two approaches to achieve this without overwriting your edits, both requiring focus on the specific package/build folder, not the entire forked framework.
Local Installation
For a quick but less maintainable solution, suitable for individual developers, copy the custom build files into your app (outside node_modules). Then, locally install it via npm by specifying the folder path:
npm install /path_to_your_buid_files
Afterward, reinstall npm dependencies:
npm install
Your custom build can now be imported using the name registered in package.json.
Creating an NPM Package
For broader benefits like ease of maintenance and better collaboration, create your npm package. After setting up your npm account, navigate to the CKEditor package folder where modifications were made, log in to NPM, and adjust package.json to reflect your npm username:
npm login
In package.json, change the name value to "@your-npm-name/your-custom-build-name". After successful login, publish your custom build:
{
  "name": "@your-npm-name/your-custom-build-name",
  ...
npm publish --access=public
In your project, install your custom build with:
npm install @your-npm-name/your-custom-build-name
Replace the standard build import in your project (e.g., import ClassicEditor from '@ckeditor/ckeditor5-build-classic') with your custom build (e.g., import ClassicEditor from '@your-npm-name/your-custom-build-name').
How to Update Your Custom Builds
To stay updated with the official CKEditor 5 framework, add an upstream remote pointing to the official repository and merge updates from the stable or master branch into your custom branch:
git remote add upstream https://github.com/ckeditor/ckeditor5.git
git fetch upstream
git merge upstream/stable
Handle any merge conflicts and rebuild your updated version:
npm run build
Commit the changes to your fork and optionally publish the updated version on npm. Update your application's npm packages to receive the new custom build version:
npm update
Utilizing a Pre-built Custom Build
For backend-focused applications where package size is not a concern, consider using a pre-built custom build with all available free plugins, installable via npm:
npm install --save @blowstack/ckeditor5-full-free-build
When using SSR frameworks, ensure JavaScript DOM API calls (e.g., window or document) are client-side. Vue.js users with SSR can utilize a Nuxt.js-specific CKEditor 5 custom build with all free plugins:
npm install --save @blowstack/ckeditor-nuxt